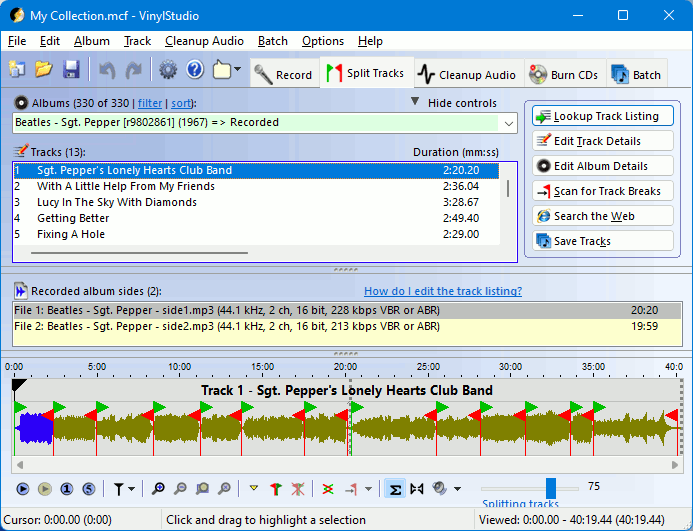

In the Split Tracks window, you can:
You can also edit an album title and/or artist, by selecting the album from the drop-down box, right-clicking on it and selecting Edit Album Details.
Please note: There is a video tutorial about this on YouTube, see: https://www.youtube.com/watch?v=CJ5poE8eAac.
It is worth doing this first as it makes splitting the recording into tracks much easier subsequently. You can do this while recording is in progress.
The first thing to try is VinylStudio's Lookup Track Listing feature. With luck, this will find a track listing which matches, or closely matches, your album. Most of the online databases also include track times, in which case VinylStudio will create track breaks for you in more or less the right places. If not, or if the retrieved listing is inaccurate, read on.

There are a number of tools in the Split Tracks window to edit an incorrect or incomplete listing, or to enter one from scratch:
 ().
().
New tracks are always added at the end of the list; you can drag them to the correct position in the list subsequently, if necessary. If you have the track times to hand (on the LP sleeve, say, or on the disc itself), it is worth typing them in, especially for classical music, as VinylStudio will then create track breaks for you in more or less the right places. You should avoid using the same name (e.g. Allegro) for different tracks in the same album as this can cause problems with Windows Media Player, , and other music players.
To import a track listing from a file, select Import Track Listing from the Album menu. Each line of the file should contain a track name followed by an optional track time in brackets, e.g.:
Yellow Submarine (2:47)
For compilation albums, follow the track artist by a hyphen with a space on either side, e.g.:
Beatles - Yellow Submarine (2:47)
If a track name contains a hyphen, you can either omit the spaces round the hyphen or type it as two hyphens, e.g:
When I'm Sixty--Four[Top]
If you have entered (or been able to lookup) reasonably accurate track times as described above, you are already most of the way there as VinylStudio will have inserted trackbreak markers for you and you will just need to position them accurately in the gaps between the tracks as described below. If not, you can try your luck with VinylStudio's Scan for Track Breaks feature. You will need to wait for recording to complete first, of course, and results can vary depending on the nature of the music.
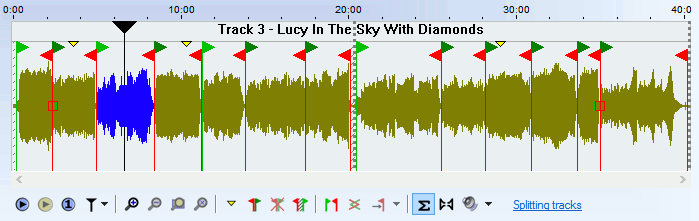
Whatever stage you are at in the track-splitting process, you can insert and / or adjust track breaks manually in the waveform display using the controls in the toolbar beneath it. Here is an example, with a few track breaks already defined:
To insert a trackbreak, drag the cursor (click on the  ) to the gap between the tracks and click on the Insert Trackbreak button
  ; you can also add a trackbreak by double-clicking anywhere in the waveform display. To split the current track when inserting a trackbreak, press and hold the .
To adjust the position of a trackbreak, click on and drag the trackbreak marker in question. Zoom in for greater precision, using the scroll wheel on your mouse or the + and - keys. Move the cursor to the area of interest first - VinylStudio centres this in the display when you zoom in.
To delete a trackbreak, click on the relevant marker and then click on the Delete Trackbreak button  . To merge the two tracks either side of the trackbreak you are deleting, press and hold the .
To eliminate the gap between tracks, position the trackbreak at the end of the first track (zooming in as necessary) then click on and drag the green start marker while holding down the shift key. VinylStudio (usually) automatically eliminates the dead air at the end of the LP side (and marks it with a grey cross-hatch). If you wish to add a fixed period of silence between each track, you can do this in the .
To move track breaks as a group, hold down the while dragging. This is useful when you have retrieved a track listing from one of the online databases and the tracks on side 2 are all a little out of kilter.
To move quickly from track to track while zoomed in, click on a track in the track listing.
To fade a track in or out, use the Adjust Faders dialog or hold down the and drag the little square boxes that then appear.
[Top]It is well worth learning how the waveform display works (and the toolbar beneath it) to get the best out of VinylStudio.
To position the cursor (the vertical black line in the waveform display), click anywhere in the waveform display or click on the and drag it to where you want it to be. VinylStudio uses the cursor to center the dislay when you zoom in, and moves the cursor along the display when the track is playing. While playing in anchor mode, clicking in the waveform display positions the anchor point (displayed as a greyed-out cursor) rather than the cursor itself. To position the cursor, shift-click.
To zoom in an out, use the various zoom buttons in the toolbar listed above, the scroll wheel on your mouse or the + and - keys. Move the cursor to the area of interest first - VinylStudio centres this in the display when you zoom in.
To manipulate the track break markers, see above.
A number of functions are also available by right-clicking inclicking on the  button above the waveform display.
The toolbar beneath the waveform display provides a number of tools to help you split your recordings into tracks quickly and efficiently. Shortcut keys are shown in backets:
 (space bar) (space bar) |
Starts playing from the current cursor position. Click in the waveform display first to position the cursor if necessary. |
 |
Stops playing. In anchor mode, the cursor will return to the anchor point (which is displayed as a greyed-out cursor while playing) unless you hold down the shift key. To switch between anchor mode and classic mode, use the 'cursor options' button  . . |
 (#) (#) |
Pauses / resumes playback. This button is only displayed in anchor mode. |
| < | Jump to the beginning of the selection (if there is one) or the recording. This is a shortcut key rather than a button. Press it twice if necessary. While playing in anchor mode, hold down the shift key to move the anchor point rather than the cursor. |
| > | Jump to the end of the selection (if there is one) or the recording. |
| ( | Move backwards by one disc rotation period. Use this when manually repairing scratches that run across the disc. You can change the rotation period for the current album in the Edit Album Details dialog. |
| ) | Move forwards by one disc rotation period. |
 (S) (S) |
Plays the current selection (shown highlighted in yellow in the waveform display). Shift-click to play in a continuous loop. To define a selection, click and drag in the waveform display. To clear the current selection, press Esc. |
| Plays a a few seconds either side of the current cursor position or track break. Stop playback before using this function. | |
|
Displays a dropdown offering a choice of various cursor options, including whether the display pans to follow the cursor when it moves off the right-hand edge of the screen while playing. |
 |
Stop playing at the next end-of-track marker. |
 (+) (+) |
Zoom in, centering the display at the current cursor position. Click in the waveform display first to position the cursor to the area of interest if necessary. You can also zoom in and out with the scroll wheel. |
 (-) (-) |
Zoom out. |
 (Z) (Z) |
Zoom in (or out) so that the current selection exactly fills the window. |
 (A) (A) |
Zoom all the way out (so that the entire recording is visible). |
 (M) (M) |
Insert a yellow marker at the current cursor position. This lets you mark a particular spot that you might want to come back to later. To delete a marker, click on it and press D. |
| (B or double click) |
Insert a trackbreak at the current cursor position. You can do this while the recording is playing if you wish, which can be handy for live albums. You can also insert a trackbreak by double-clicking anywhere in the waveform display. To split the current track when inserting a trackbreak, press and hold the . |
| () |
Delete the trackbreak under the cursor. Click on the trackbreak you want to delete first. To merge the two tracks either side of the trackbreak you are deleting, press and hold the . |
 (F) (F) |
Adjust the faders for the trackbreak under the cursor. This lets you set up a 'cross-fade' between one track and the next. Click on a trackbreak first. You can also adjust faders by holding down the and dragging the little square boxes that then appear. |
 (C) (C) |
Determines whether you hear corrected or uncorrected (i.e. the original, as recorded) audio when you click Play. Corrections, such as scanning for clicks and removing tape hiss, are applied in the Cleanup Audio window. |
 |
Turns off audio in the left or right-hand channel (so that you can listen to just one). |
 |
Opens the Windows mixer applet, which allows you to adjust the playback volume. You can also change the current playback device by clicking on thew down-arrow. |
 |
Allows you to change the current playback device (but most Macs have only one anyway). |
| J | Jump back one second. Shift+J jumps back 10 seconds. |
| P | Jump to the previous track break. |
| N | Jump to the next track break. |
| ? or / | Announce what track or track break the cursor is on (Mac only, turn on VoiceOver). |
| [ | Nudge the current track break marker to the left. Press and hold the control key to nudge in larger amounts. |
| ] | Nudge the current track break marker to the right. Hold down the shift key to nudge the start of track marker only. |
 (T) (T) |
Zoom the waveform display to encompass the current track. |
| ` (back quote) | Switch to the Cleanup Audio window (toggle). |
| 1 | Scrub backwards (hold key down). You can set the scrubbing speed in the Cursor Options menu. |
| 2 | Scrub forwards. |
| 5 | Play through all the track breaks, one at a time, starting from the current cursor position. |
| 6 | Remember the current zoom level and cursor position. |
| 7 | Return to the zoom level saved above. |
| 8 | Return to the cursor position saved above. |
| 9 or ( / 0 or ) | Go forwards or backwards one rotation of the record, approximately. Useful for repairing long scratches manually. |
In addition, you can use the arrow keys as follows:
TIP: it's worth learning the shortcut keys for the functions you use most; it can save a lot of time if you have a lot of albums to process. The shortcut key for a particular toolbar button is also displayed when you hover over it with the mouse.
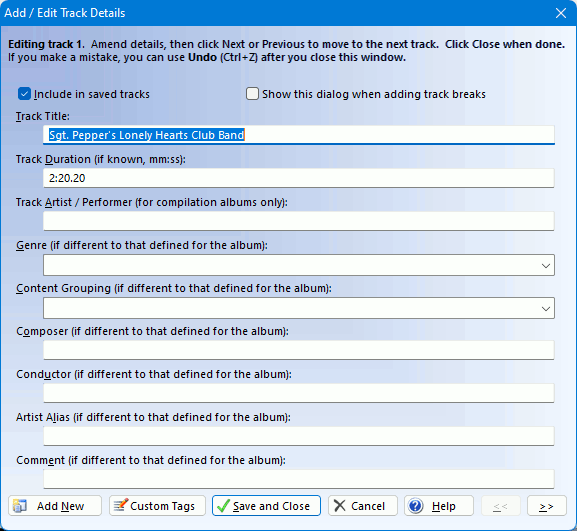
[Top]You can edit the various bits of information that VinylStudio stores for an current album by clicking on the Edit Album Details button (or by selecting Edit Album Details from the Album menu):
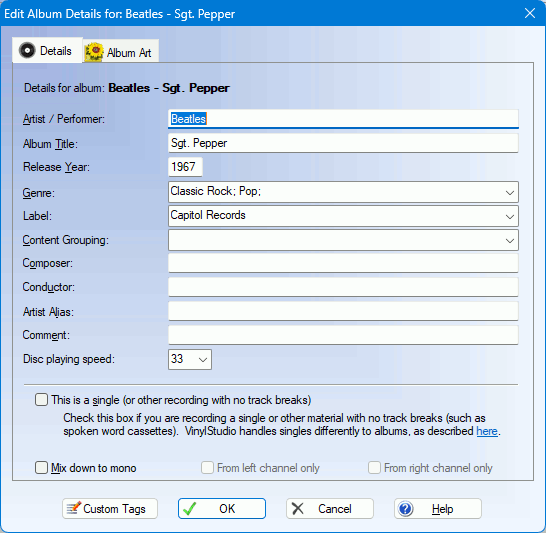
You can enter whatever information you have to hand in this dialog. Any information you enter will be stored (as tags) in the files you generate when you save your tracks. For more information on recording singles, click here.
Information on what the This is a single checkbox does, can be found here.
Mix down to mono specifies that the tracks for this album will be saved in mono rather than stereo. Some people prefer this for mono material and it can save some disk space, especially when saving in uncompressed formats.
From left channel only / From right channel only: when mixing down to mono, checking one of these boxes will take audio from that channel only. This can be useful when there is noise in the other channel.
Album art can be imported from files on your hard disk or looked up over the internet. You can also drag and drop images from most web browsers or from Explorerthe Finder, or you can use Copy and Paste.
To import from an existing file, click Open File and navigate to the file on your hard disk. VinylStudio will embed the image in any files it generates for this album when saving tracks and it will scale it down if necessary to keep the embedded image down to a reasonable size. You can control VinylStudio's exact behaviour in this regard in the .
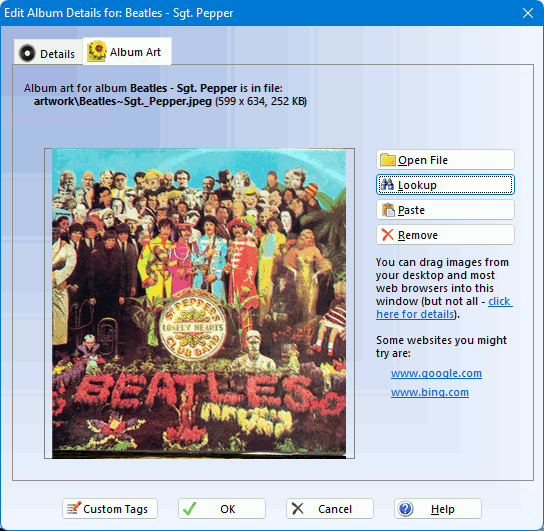
Not all web browsers support drag and drop for images. We have tested the following:
Chrome Supported. Edge Supported. Firefox Supported. Opera Supported. Safari Supported. Internet Explorer Supported for certain images only (specifically, those that do not link to another page or image).
All the browsers we have tested on the Mac (Safari, Firefox and Chrome) support drag and drop of images.
Where a browser does not support drag and drop, save the image as a file and then open that file via the Open File button, or use Copy and Paste.
[Top]Once you have positioned all your track breaks and entered all the track details (a lot of which is automated if you can find your album in one of the online databases that VinylStudio supports) then click on Save Tracks in this window to save your tracks:
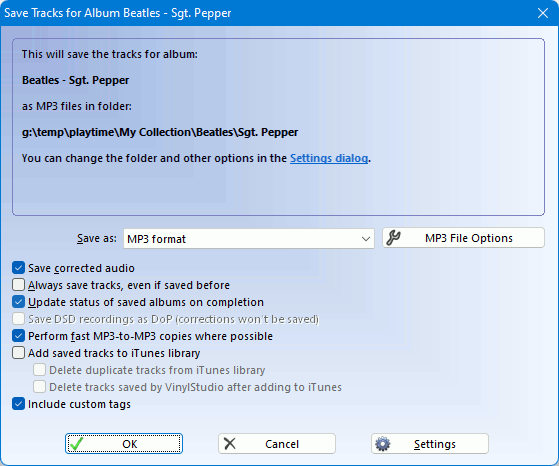
Select the file type you want to save to and any relevant options (such as the level of compression for MP3 files, for example) and then kick the process off. VinylStudio will then save your tracks and log the results. If all is well, the resulting files should be ready for use. If not, the log will tell you what went wrong and you can correct it and try again.
You can also save individual tracks by selecting Save Track As from the Track menu. This lets you try out the effect of the audio cleanup tools in the trial version.
VinylStudio can save your tracks in a variety of file formats, depending on what you need. These can then be played in Windows Media Player, , and other music players, or copied out to an MP3 player or memory stick. AAC and Apple Lossless are the file formats favoured by (although MP3 also works). Windows Media Player prefers WMA or MP3. Please note that you can (and usually do) save your tracks in any format, regardless of the format you recorded to.
If you record to DSD format, you can save your tracks as either DSD or PCM, depending on the file format you choose. If you save as DSD, any audio cleanup you have applied (including declicking) will be ignored.
The available options are as follows (not all of these options are displayed for all file types):
By default, saved tracks are saved in the following folder:
Music
    <Name of your collection>
You can change this in the , and you will also find tools in there to change the way your saved files are named.
can also save tracks for several albums at a time. You do this in the Batch window.
[Top]( only).
VinylStudio does this by default, if iTunes in installed. If you prefer it not to, uncheck 'Add saved tracks to library' in the above dialog. If the process stalls, check whether is displaying some kind of popup.
You might consider configuring to not copy tracks into its media folder when they are added to the library. This can save a lot of disk space. You can set this option in the 'Advanced' section of the Preferences window. Alternatively, use VinylStudio's 'Delete tracks saved by VinylStudio after adding to ' option. Don't use both together!
[ Top ]