
The Cleanup Audio window lets you remove clicks, scratches, tape hiss from your recordings and more. You don't need to save working copies of your files as you edit them - VinylStudio keeps track of your changes and applies them as and when needed (to any CD's you burn or tracks you save) whilst keeping your original recordings intact. This can save a lot of disk space, and, coupled with extensive Undo  and Redo
  facilities, makes VinylStudio a productive and forgiving working environment. VinylStudio's audio cleanup features are not just a toy; used correctly, they can achieve excellent results, even on badly damaged recordings.
In the Cleanup Audio window, you can:
Follow any of the links above for more information.
The Cleanup Audio window also offers a number of 'housekeeping' tools, which let you:
Again, follow any of these links for details.
Please note that if you have VinylStudio Lite, the audio cleanup features can only be used on a trial basis. Specifically, you cannot burn cleaned up audio to CD or to saved tracks. To upgrade, select 'Upgrade to Full Version' from the Help menu.
There are a lot of things you can do in the Cleanup Audio window and it's easy to get lost at first, so for new users, we recommend that you proceed as follows:
It is also worth spending a few minutes familiarising yourself with the operation of the waveform display and associated toolbar as described in the sections below.
As you become more proficient, it is worth exploring the available filter settings in more depth as there is a lot you can do with them. In particular, the rumble filter should be applied to all vinyl recordings and the hum filter can make a big difference in certain cases.
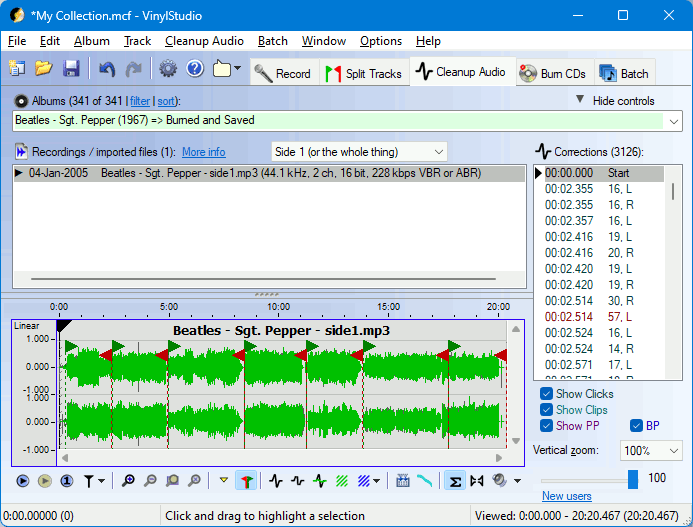
[Top]Unlike the Split Tracks window, which works on the album as a whole, the Cleanup Audio window works on one album side at a time. The display shows the audio signal both before and after any click repairs have been applied (one signal is superimposed on the other). The original signal is shown in green and repaired clicks are shown in grey:
Most of VinylStudio's functions work with the current selection. To define a selection (which is shown shown in yellow), click and drag in the waveform display. You can subsequently adjust the either edge of the selection by clicking on it and dragging. To clear the selection, press Esc.
Positioning the cursor and zooming in and out work in the same way as in the Split Tracks window but it is worth repeating that, when you zoom in, VinylStudio uses the uses the current cursor position to centre the display (so you should position the cursor near the area of interest before you zoom in). The waveform display is more fine-grained than the one in the Split Tracks window, and you can zoom right in to see the individual samples if you wish.
A number of functions are also available by right-clicking inclicking on the  button above the waveform display.
( only).
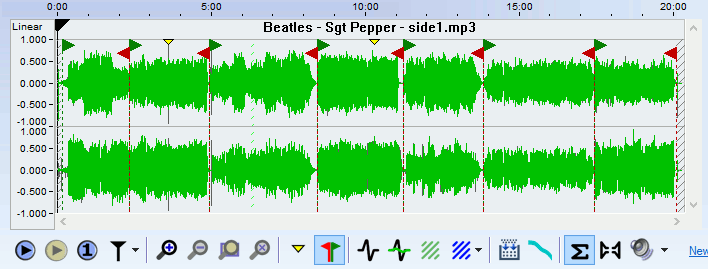
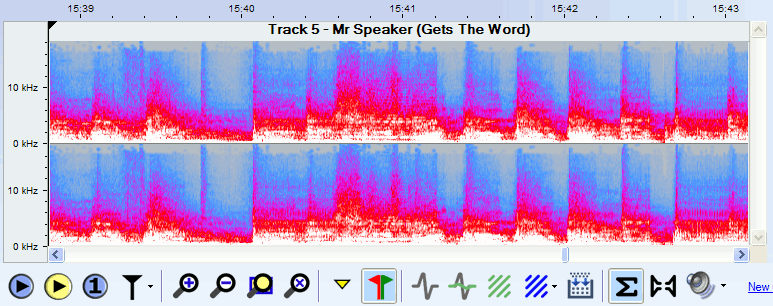
Spectral View shows the way that the frequencies are distributed in the audio stream. It can be useful for locating hard-to-find clicks which tend to show up as spikes in the display when zoomed in enough. To best see such clicks, adjust the viewing window to span about 5 seconds of audio. Note that corrected clicks are hidden in the spectral view when corrected audio is being displayed (press C to toggle).
The colours in the display represent signal power at the frequency given by the Y coordinate. The colours are:
Grey Minimum Blue Low Red Medium White High
You can adjust spectral view options (FFT size and maximum frequency displayed) via the Options menu. To switch between Spectral View and the regular waveform display, press V or use the Cleanup Audio or right-click menumenu or click on the button above the waveform display.
You need a reasonably fast PC to use spectral view effectively. The display speeds up as you zoom in. Switch back to the normal waveform display (V) when zooming out for better performance.
[Top]( only).
VinylStudio can display a frequency analysis of part or all of your recording which can help you decide how to build an FFT filter to filter out unwanted noise:
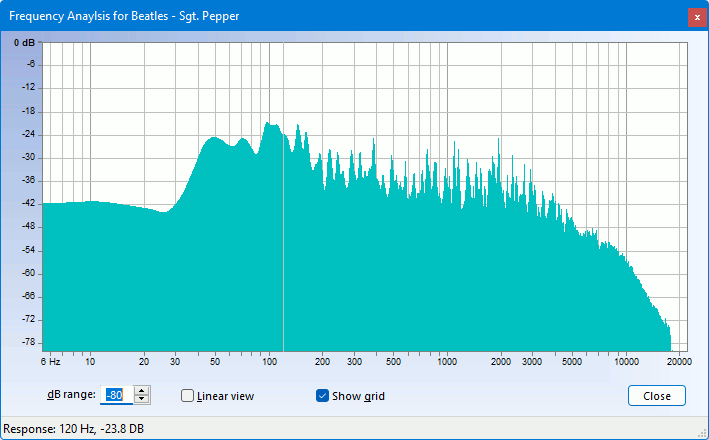
Select 'Perform Frequency Analysis' from the Cleanup Audio window to display the Frequency Analysis window. selecting the section of audio you are interested in first. Read off unwanted peaks in the display by moving the cursor over them and use this information to construct an FFT filter in the Equalisation curves window.
[Top]The buttons in the toolbar have the following functions (shortcut keys are shown in backets):
 (space bar) (space bar) |
Starts playing from the current cursor position. Click in the waveform display first to position the cursor if necessary. |
 |
Stops playing. In anchor mode, the cursor will return to the anchor point (which is displayed as a greyed-out cursor while playing) unless you hold down the shift key. To switch between anchor mode and classic mode, use the 'cursor options' button  . . |
 (#) (#) |
Pauses / resumes playback. This button is only displayed in anchor mode. |
| < | Jump to the beginning of the selection (if there is one) or the recording. This is a shortcut key rather than a button. Press it twice if necessary. While playing in anchor mode, hold down the shift key to move the anchor point rather than the cursor. |
| > | Jump to the end of the selection (if there is one) or the recording. |
| ) | Move forwards by one disc rotation period. |
| ( | Move backwards by one disc rotation period. Use this when manually repairing scratches that run across the disc. You can change the rotation period for the current album in the Edit Album Details dialog. |
| ] | Move the cursor to the next yellow marker. |
| [ | Move the cursor to the previous yellow marker. |
| } | Move the cursor to the next click. |
| { | Move the cursor to the previous click. |
 (S) (S) |
Plays the current selection (shown highlighted in yellow in the waveform display). Shift-click to play in a continuous loop. To define a selection, click and drag in the waveform display. |
| Plays a brief snatch of music spanning 1 second either side of the current cursor position. | |
|
Displays a dropdown offering a choice of various cursor options, including whether the display pans to follow the cursor when it moves off the right-hand edge of the screen while playing. |
 |
Stop playing at the next end-of-track marker. |
 (+) (+) |
Zoom in, centering the display at the current cursor position. Click in the waveform display first to position the cursor to the area of interest if necessary. You can also zoom in and out with the scroll wheel. |
 (-) (-) |
Zoom out. |
 (Z) (Z) |
Zoom in (or out) so that the current selection exactly fills the window. |
 (A) (A) |
Zoom all the way out (so that the entire recording is visible). |
 (M) (M) |
Insert a yellow marker at the current cursor position. This lets you mark a particular spot that you might want to come back to later. To delete a marker, click on it and press D. Markers also appear in the corrections list, and you can select a marker by clicking on it in the list. |
 |
Show / hide track breaks (toggle). |
 (N) (N) |
Scan the recording (or current selection, if any) for clicks. To define a selection (highlighted in yellow), click and drag in the waveform display. |
 (L) (L) |
Scan the recording (or current selection, if any) for clips. To define a selection (highlighted in yellow), click and drag in the waveform display. |
 (R) (R) |
Insert a click repair at the cursor position manually. Use this if VinylStudio has failed to find the click by scanning. Click in the left or right-hand channel first to determine where the repair will go. To adjust the width of a repair, zoom in on it and drag either edge. You can also do this by pressing Shift+R, which allows you to enter the width of the repair before VinylStudio inserts it. To select an existing repair, click on it in the corrections list list. |
 (P) (P) |
Patch the current selection. Use this to repair damaged areas, such as scratches or dropouts, which are too wide for VinylStudio's click repair capabilities. To select a patch, click on it in the corrections list list. |
 (X) (X) |
Cut out the current selection, and cross fade the edges of the cut with the surrounding audio. To select a cut, click on it in the corrections list list. |
 (F) (F) |
Opens the filter settings dialog, which allows you to filter out tape hiss, hum and rumble, and includes a graphic equaliser. |
 (E) (E) |
Opens the Equalisation curves (FFT filters) dialog, which allows you to apply precise equalisation or filtering, including RIAA and other recording equalisation curves. |
 (C) (C) |
Determines whether you hear corrected or uncorrected (i.e. the original, as recorded) audio when you click Play. Corrections, such as scanning for clicks and removing tape hiss, are applied in the Cleanup Audio window. |
 |
Turns off audio in the left or right-hand channel (so that you can listen to just one). |
 |
Opens the Windows mixer applet, which allows you to adjust the playback volume. |
 |
Allows you to change the current playback device (but most Macs have only one anyway). |
| ` (back quote) | Switch to the Split Tracks window (toggle). |
| J | Jump back one second. Shift+J jumps back 10 seconds. |
| V | Switch to and from Spectral View (toggle). |
| 6 | Remember the current zoom level and cursor position. |
| 7 | Return to the zoom level and saved above. |
| 8 | Return to the cursor position saved above. |
| 9 (or 0) | Go forwards (or backwards) one rotation of the record, approxinmately. Useful for repairing long scratches manually. |
| ' (single quote) | Reset the peak level indicator (when the Filter Settings or Equalisation Curves window is open). This also works in the Record and Check Level windows. |
In addition, you can use the arrow keys as follows: