
The essential steps to record an album are as follows:
Depending on your preference, albums can be recorded as one single file or one side at a time, and, usually, VinylStudio will stop recording when your record deck lifts the needle at the end of the disk.
For more details, please refer to the following list:
Start the record or tape playing and then click on the Check Level button. If all is well, you should then see the recording level indicators moving in time with the music (you may need to select the correct input device in the dropdown boxes first time through):
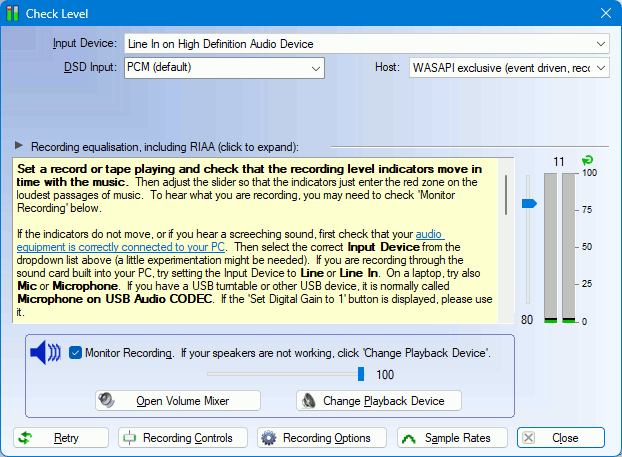
While the album is still playing, adjust the recording level using the slider. The recording level indicators should just enter the yellow zone on the loudest sections of music. If the indicators flash completely red (or indicate 'CLIP'), you need to reduce the level.
If you cannot get the recording indicators to move in time with the music, you will need to check that your turntable (or tape deck) is hooked up to your correctly. There are some details on how to do this here.
Leave Host set to 'WASAPI exclusive (polled)' unless you run into difficulties (it can occasionally be a bit temperamental), in which case please try one of the other options. WASAPI exclusive allows VinylStudio to control the sample rate and bit depth used by the hardware and is recommended for that reason. If you use one of the other options, you can do set in the Windows Settings app instead (set it to match what you have configured in VinylStudio).
The Sample Rates button will show you what sample rates and bit depths your hardware supports.
If you wish to record in DSD format, see also Recording DSD
If you have a USB device, the Check Level dialog might look like this:
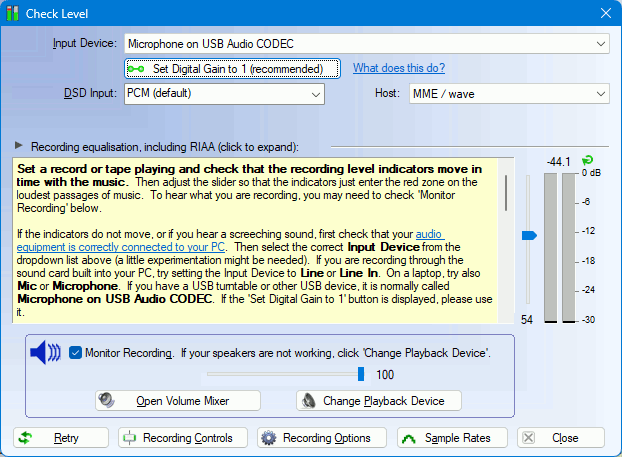
In this case, you should use the 'Set Digital Gain to 1` button to set the recording level. This gives the best dynamic range and minimises the risk of clipping. The important thing to note is that the recording level on your USB audio device is not adjustable (except perhaps via a knob on the front of the unit). The slider just boosts or cuts the gain after the signal has been digitised, and either of these actions is undesirable. If you need to boost the playback level after recording, you will find the tools to do it in the Graphic Equaliser window.
If you are using Windows XP, the Check Level dialog looks a little different:
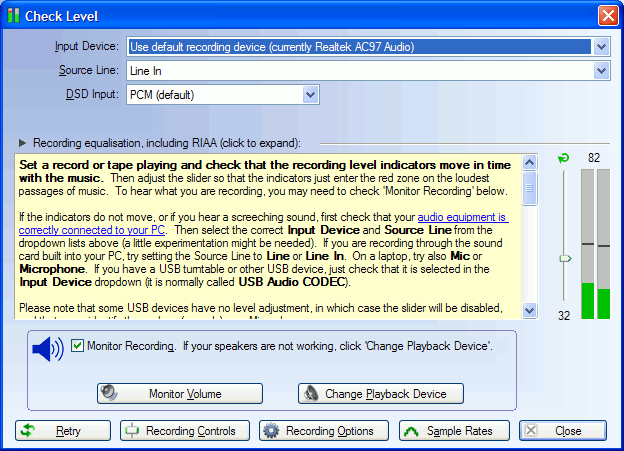
In this case, select your input device and source line from the Input Device dropdown and then proceed as above.
Some USB devices, for example Ion USB Turntables and the NAD PP4 phono pre-amp, have no software level adjustment. There is nothing VinylStudio can do about this as any clipping which occurs happens before the signal reaches the computer. Some devices a manual control on the unit itself, which can be a big help.
If this is a major bugbear for you, you might consider disconnecting the USB cable and running a cable from line out on the USB device (most USB devices have one) to line in on your computer's sound card instead (if it has one). VinylStudio's normal level control will then become available. The cable you need is a 3.5mm Jack to Twin Phono Lead as pictured here.
If you need to boost the playback level after recording, you will find the tools to do it in the Graphic Equaliser window.
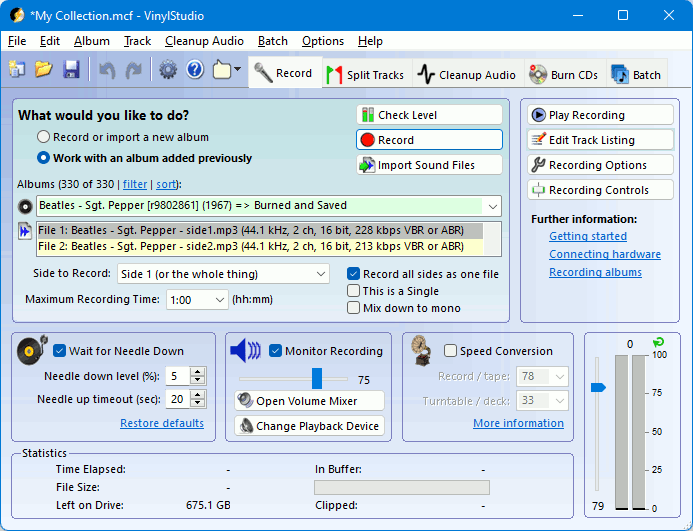
[ Top ]Once everything is connected and working, note the following area of the Record window:
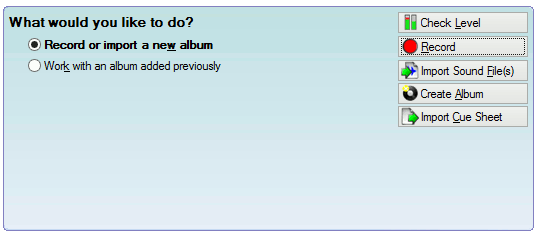
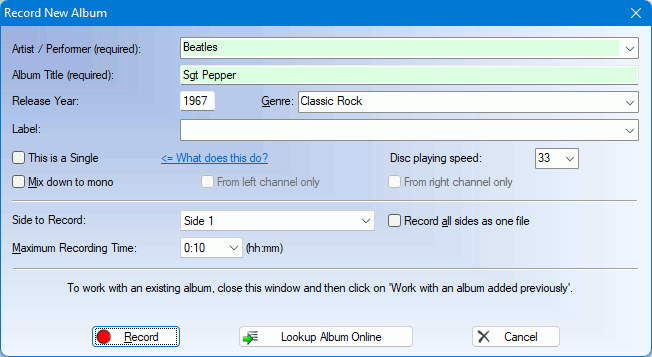
To record an album:
The following dialog is then displayed (shown with some fields filled in):
To start recording:
Recording should then start. If it does not, see setting the needle down level below.
Notes:
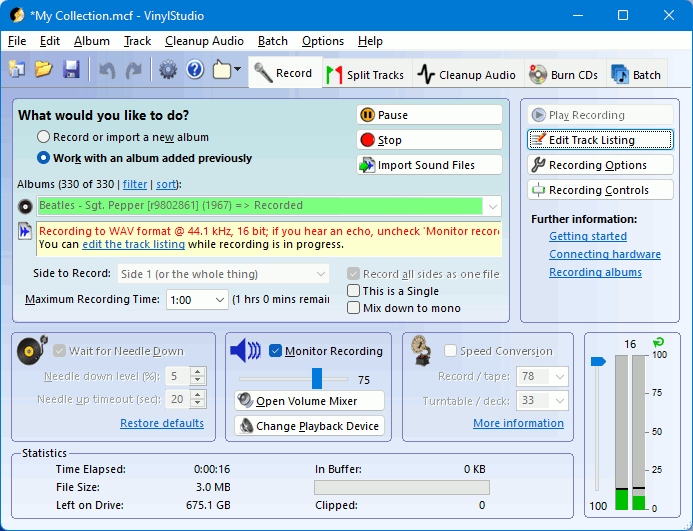
To listen to what you are recording, check the Monitor Recording box. The sound might be slightly choppy on low-end machines or if you run other applications while recording, but your recording is not affected. Uncheck this box if you hear an echo (again, your recording is not affected). Use the Monitor Volume button to change the monitor playback level - again this does not affect the recording in any way - and use the Change Playback Device button to select a different playback device if no sound is coming from your speakers.
If your record deck lifts the needle or stops the turntable at the end of the record, recording will stop automatically. Alternatively, you can select a maximum recording time from the dropdown list.
If the 'clipped' counter starts to mount up while your are recording, consider reducing the recording level and re-recording as loud passages of your recording may sound distorted.
You can edit the track listing for the album you are recording it (or you can do this later - it's up to you). To do this, click on the Edit Track Listing button which will take you to the Split Tracks window. To return to the Record window at any time, click on the Record tab at the top of the window.
You can also insert a trackbreak while recording by pressing B, or a marker by pressing M. These will become visible when recording is complete. You can do this from both the Record and Split Tracks windows. Note that the B key works best if you delete any existing track breaks before you start recording.
[ Top ]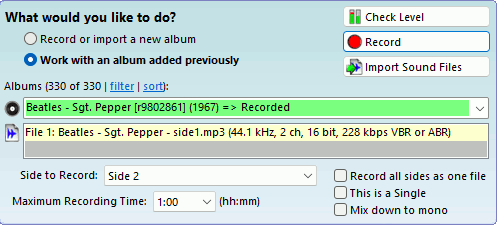
If you elected to record each album side separately (i.e. as a separate file), then to record side 2 (or 3 or 4) proceed as follows:
You can first select the album you wish to record from the drop-down list if needs be and you might like to use Check Level to set the recording level (although two sides of the same LP don't usually vary that much).
[ Top ]The best way to record from tape is to check the 'Stop at end of tape' box. VinylStudio will then stop recording when it detects silence at the end of the tape.
You might need to adjust the Needle Up Timeout and Needle Up Threshold settings to get the best results, especially if there is a lot of tape hiss.
[ Top ]If you check the Wait for Needle Down box, VinylStudio will wait for you to lower the needle before it starts recording and, as long as your record deck has an automatic tone arm, it will stop recording automatically at the end of the record.
The default Needle down level setting of 5% works in the majority of cases, but you might need to adjust it if:
For case (a), start the record playing and use the Check Level button to ensure that the recording level indicators are moving in time with the music. If they are not, you need to sort the problem out before you can record anything.
For case (b), you can increase the Needle Down Level setting and try again, but the real problem might be that there is a high level of background noise (typically mains hum) and you might look into this first. Also, it is essential that you do not lower the needle until VinylStudio asks you to.
If VinylStudio stops recording between tracks, rather than at the end of the record or tape, try increasing the Needle up timeout setting.
As mentioned above, when recording tapes you may get better results if you uncheck the Wait for Needle Down box and set a maximum recording time instead.
[ Top ]The easiest way to record singles or 78s is to add each side of each single or 78 to your collection as a separate album and check the This is a single box in the Record window. VinylStudio will then:
Thus, for example, if you wanted to record Elvis Costello's Watching the Detectives, you would:
This process is then repeated for the B side, and so on for your other singles until you have enough tracks recorded to burn a CD or save your tracks.
For EP's (remember those?), you can do the same thing and insert additional track breaks manually in the Split Tracks window.
If you had, say, a tape of an interview with The Dalai Lama, the procedure is much the same as recording one side of a single or 78. Thus you would:
For more information on how singles tracks are named when they are saved, please refer to where are my files located?
[ Top ]If you wish to record 78's on a turntable with no 78 RPM speed setting, check the Speed Conversion box and set the record and turntable speeds appropriately. We recommend recording 78's at 45 RPM (rather than 33), as this preserves more of the bass notes. You can also record 33's at 45 RPM to save time, but you will lose a little treble by doing so.
If you are using speed conversion when recording records, we recommend enabling recording equalisation in the Check Level dialog. This enables VinylStudio to compensate for the change in turntable speed (which affects the RIAA equalisation built into your phono preamp). See below for more details.
For tapes, type numbers in the boxes as shown in the following table:
| Normal playing speed of tape | Running speed of tape deck | Set 'Tape' box to: | Set 'Deck' box to: |
| 1 7/8 ips | 3 3/4 ips | 10 | 20 |
| 1 7/8 ips | 7 1/2 ips | 10 | 40 |
| 1 7/8 ips | 15 ips | 10 | 80 |
| 3 3/4 ips | 1 7/8 ips | 20 | 10 |
| 3 3/4 ips | 7 1/2 ips | 10 | 20 |
| 3 3/4 ips | 15 ips | 10 | 40 |
| 7 1/2 ips | 1 7/8 ips | 40 | 10 |
| 7 1/2 ips | 3 3/4 ips | 20 | 10 |
| 7 1/2 ips | 15 ips | 10 | 20 |
| 15 ips | 1 7/8 ips | 80 | 10 |
| 15 ips | 3 3/4 ips | 40 | 10 |
| 15 ips | 7 1/2 ips | 20 | 10 |
For best results, set the deck speed as close as possible to the tape speed. Faster deck speeds will save you time but cost you treble which the graphic equaliser can only partially correct. And also, please note that VinylStudio actually implements this feature by changing the sample rate of your recording device, so don't be surprised if the front panel display doesn't show what you're expecting.
[ Top ]( only).
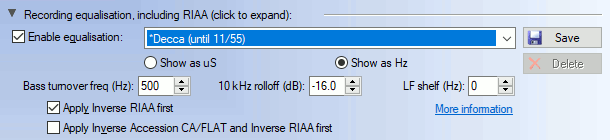
VinylStudio has a software recording equalisation feature which can either be applied at record time or after recording is complete. You can use software equalisation effectively even when recording at 16 bits per sample (which you might want to do to conserve disk space) because VinylStudio will configure your recording device for 24 bit (assuming it supports it), thus avoiding any loss of dynamic range. Equalising at record time also has the advantage that you see the equalised signal in the waveform display.
Recording equalisation is enabled in the Check Level dialog. When you change this setting, the recording level will also change, so make sure this is correct before you start recording. For discs cut from 1954 onwards, the RIAA preset should generally be used. For earlier discs, VinylStudio comes with a large number of preset curves but selecting the right one can be a challenge. Try consulting the sleeve notes or plug in a decent set of headphones and adjust the parameters by ear. Increasing the bass turnover frequency will boost bass notes. Increasing the 10kHz rolloff value will cut treble. You can save your settings as a preset, and you can also enter time constant values if that is the information you have.
When using recording equalisation, use the 'flat' switch on your phono preamp if it has one. If it doesn't, check the 'Apply inverse RIAA first' box. You should use VinylStudio's recording equalisation if speed conversion is enabled, even if your preamp has no flat switch. The change in turntable speed will fool your preamp into applying the wrong curve and VinylStudio corrects this. For older 'acoustic' recordings which require no equalisation at all, just select 'Inverse RIAA' from the dropdown box if your phono preamp has no 'flat' switch.
If you are recording via a Graham Slee Accession preamp set to CA/FLAT, the procedure is slightly different. If you are recording a disc that uses standard RIAA equalisation, just select 'Inverse Accession CA/FLAT' from the dropdown. If, on the other hand, you are recording an older disc that requires a different equalisation curve, select that from the dropdown instead and check the 'Apply Inverse Accession CA/FLAT and Inverse RIAA first' box.
The equalisation curves built into VinylStudio were taken from the Audacity wiki, http://wiki.audacityteam.org/wiki/78rpm_playback_curves and references therein, with much thanks. You can also enter the parameters yourself for certain curves by looking them up at Vinyl Engine: www.vinylengine.com/cartridge_database_record_equalization.php.
The Inverse Accession CA/FLAT curve is supplied courtesy of Graham Slee, see:
www.alpinesoft.co.uk/VinylStudio/accession_ca_flat.aspx.
( only).
To make the best use of VinylStudio's recording equalisation feature when recording 78s, proceed as follows:
VinylStudio will then apply the correct equalisation curve to your recording.
Alternatively, you can apply equalisation after recording in the Equalisation Curves window.This has the advantage that you can experiment with different curves to see what sounds right. Do this before saving your tracks.
[ Top ]If you wish to use an ASIO driver, open the Check Level dialog and select ASIO from the first dropdown list. You can then select your ASIO driver (there is normally only one) and mappings for the left and right channels (again, the defaults will normally do).
If you experience 'dropouts', try increasing the buffer size in the ASIO control panel. You may also find level controls in here. The appearance of the ASIO control panel varies from device to device.
You can also use ASIO as your playback device if desired. To do this, select 'Change Playback Device' from the Check Level dialog and select ASIO in the first dropdown list. Please note that if you are using ASIO4ALL, you will probably need to set it as both the recording and playback device.
[ Top ]( only).
From Windows Vista onwards, VinylStudio supports loopback recording - i.e. it can record whatever is playing through your computer's speakers. To enable this, just select 'Loopback' in the Input Device dropdown in the Check Level dialog.
Please note the following quirks when using loopback:
( only).
If you have an ADC which supports DSD over PCM, VinylStudio can now record DSD files. To configure VinylStudio and your ADC to record DSD, proceed as follows:
On Windows Vista and later, if you are unable to use WASAPI for recording for some reason you can get away without it, but you must then set Windows' shared recording format in the Sound section of the Control panel as follows:
WASAPI is usually available (and functional) however.
Please note that DSD can only be recorded to DFF, DSF, WAV, AIFF and CAF files, and that you will need a fast computer (2-3GHz+) to work with them. Also, VinylStudio's editing features do not work with them, including:
You can however use these features (except for the first one) if you save your tracks as PCM or when burning audio or data CDs or DVDs. However, VinylStudio also supports saving DSD recordings as DSD, which is a bit-transparent operation and ignores any edits you might have made. Sorry about that, but DSD is not an editable format, simple as that.
DFF, DSF, CAF and WAV64 have no practical limitations, and recording to DFF or DSF files is to be preferred as the files are 2/3 the size of the corresponding WAV, AIFF or CAF files.
There are currently some issues with this device which you need to be aware of to make successful DSD recordings. As a result, you must:
There are severe issues with the PS Audio recording DSD on Windows XP which cause VinylStudio to misbehave or crash so please don't try it; this situation is unlikely to change.
Set the recording level slider to maximum when recording DSD from this device.
If you wish to import an existing sound file (e.g. a recording made in another program), you will find details here.
If you are short of disk space, you might want to record to a compressed file format (such as MP3). More information can be found here.
VinylStudio automatically sets the album status to 'Recorded' when recording is complete (even if you have recorded only side 1).
[Top]