In addition to the information in this guide, there are also some tutorial videos on our forum:
www.alpinesoft.co.uk/forum/index.php?topic=725.0
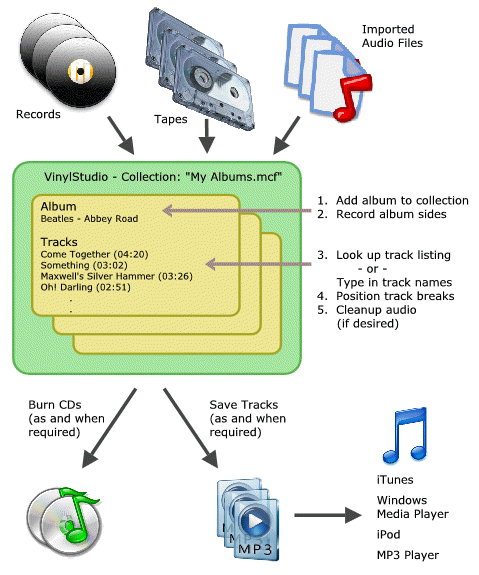
VinylStudio's view of the world looks like this:
As you can see, VinylStudio organises your recordings in a collection. You don't need to open, edit and save audio files in the way you might be used to. The only time you might do this is when you import an existing recording into your collection. After that, you just select the file you want to work on from a dropdown list and VinylStudio will take care of the rest. You can create as many collections as you like, but you must create at least one. VinylStudio will prompt you to create a collection when it first starts up. You can create another one any time you need it via Menu -> File -> New Collection.
Within a collection, VinylStudio stores your recordings as a list of albums. These are recorded a side at a time and these recordings are then split up into individual tracks which can then be played on your , downloaded to an MP3 player or iPod, or burned to CD. You can also elect to remove clicks, hiss, hum and rumble before you save your tracks and there is also a graphic equaliser. VinylStudio can also digitise singles and the spoken word.
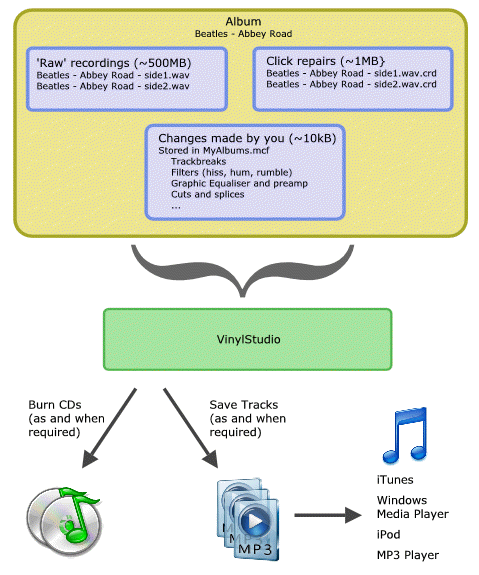
It is important to realise that VinylStudio is not an audio editor. That is to say, it does not directly edit your recordings or any audio files you might have imported. Instead, VinylStudio is 'non-destructive'. Any changes you make within the program are stored separately and then 'overlayed' onto the original audio when you save your tracks or burn CDs. Consider VinylStudio as a decision-making tool, where you can change those decisions later if you choose. Your original recordings are never altered.
This, once you get to grips with it, is a big plus. You do not, for example, have to worry about keeping both original and cleanup-up copies of your recordings. It also means that if you change your mind about something (perhaps you overdid it with the hiss filter) you can go back into VinylStudio, make whatever changes you feel appropriate and then save your tracks again (or burn another CD).
1. You first need to hook up your turntable or tape deck to your and check that it is working correctly. This is covered in more detail here. Don't miss the section entitled 'Testing your Setup' near the end. The golden rule is that you need to see the recording level indicators moving in time with the music (and not stuck on maximum, for example).
2. VinylStudio has five main working areas, which you select by clicking on the tabs at the top of the VinylStudio window:

3. To record an album, click on the Record tab (if necessary) which will take you to the Record window where you can enter the artist and title of the album you wish to record. Albums are recorded one complete side at a time and you should record both sides of the album before you proceed to the next step. Alternatively, if you have already recorded the album in another program, you can import an existing recording. You can also record singles, or other material with no track breaks.
4. While your album is recording, you can lookup or type in the album's track listing. With luck, you will be able to find a track listing on-line.
5. Once you have a recording to work with, you need to split it into tracks, which you do in the Split Tracks window. Please note that no additional files are created at this point (this happens later on). You are merely telling VinylStudio where the tracks begin and end. We recommend you start with an album you know well, as this makes the task a good deal easier.
6. You can also, if you wish, removes clicks, scratches, hiss and hum from your recordings. This step is optional, but often worthwhile. VinylStudio does not make any changes to your original recordings when you do this, so feel free to experiment. And if you decide, when listening to a CD you have made, that these features might be worth a try after all, you can always give them a whirl and then burn another CD. Declick your recording (if it needs it) before applying any of the other filters for best results.
7. When you are happy with the results of your work, you can burn CDs and/or save your tracks as individual, tagged files. These files can be played on any computer (using Windows Media Player or , typically) or copied to your iPod or MP3 player. VinylStudio for Macintosh can also save tracks in AAC (MP4) format.
Most actions in VinyStudio can be undone with the Undo / Redo buttons in the toolbar 
 ( / ).
VinylStudio can record to, and work with, files in a variety of formats. Uncompressed formats (such as WAV) provide the best performance and musical fidelity while a compressed format (such as MP3) is much more economical on disk space. See here for more information.
VinylStudio provides additional tools for keeping track of your collection as it grows. The are: