
Digitizing Vinyl Records and Tapes with VinylStudio
See also Scot Hacker's blog for a comprehensive guide. |
1. Introduction
This guide sets out how to digitise you records and tapes with VinylStudio. VinylStudio is computer software that sets out to make this job as quick and easy as possible without compromising on results. All you need is a PC or Mac, a record or tape deck, a cable or two and possibly a phono pre-amp. USB turntables, cassette decks and other devices are also supported.
The results of your efforts will an audio file for each track that you can play on your computer, import into your favourite player application or copy to a streaming media server. VinylStudio can also produce CDs that you can play in any player.
2. What is VinylStudio?
VinylStudio is software dedicated to digitizing vinyl albums and tapes. It provides all the tools you need - recording, track splitting, click, hiss and hum removal and CD burning - all in a single package. It also helps manage your collection as your recordings build up, rather than having to keep track of, potentially, thousands of individual audio files. Added together, these things make a big difference. VinylStudio can save you lots of time, free up hard disk space and is highly affordable. It also makes the job a lot more fun and gives excellent results.
VinylStudio can handle vinyl, tapes, 78s and singles, all with equal facility.
3. What is Involved?
Apart from the obvious problems of connecting up your recording equipment to your computer (which is covered below) and recording your music, there is the question of how you keep track of all the files involved and how you turn them into something more useful.
The way VinylStudio approaches the problem is to build up a collection. This consists of the recordings themselves, album and track name information, track boundaries and the results of any audio cleanup> work you have carried out (primarily filtering out clicks and hiss). VinylStudio then has enough information to burn CDs containing proper track boundary information (just like the ones you buy in the shops) and to save your tracks as individual files, properly organised, named and tagged.
All of the steps in this process can be done using the tools provided in the program and most are largely automated. For example, having told VinylStudio the names of your tracks and where the trackbreaks are, you can instruct VinylStudio to burn a CD and then go off and do something else.
4. What kind of Computer do I Need?
VinylStudio will run on any of the following computers / operating systems:
- a reasonably modern PC running Windows XP or later
- an Intel-based Macintosh running OS X 10.6 (Snow Leopard) or later
Disk Space: The main thing you need is plenty of disk space. Using VinylStudio's default settings, each recorded album takes up about 500MB (= 1/2GB), and the split-up tracks take about the same again. You can delete your recordings after you have processed them, but it's worth hanging on to them if you can as you can then come back to them later on if you change your mind about anything. If you are really hard up for disk space, VinylStudio can record direct to MP3 format but we would only recommend this if you have no alternative.
If you need more disk space, an external USB hard drive is the best bet.
Processor Speed and Memory: If you plan to use VinylStudio's audio cleanup tools life will be easier if you have a machine with a reasonably fast processor - we would recommend 1Ghz or better - and at least 1GB of memory.
Sound Card: The sound card built in to many modern computers are surprisingly capable, but can sometimes introduce background noise into the signal picked up from your computer's electronics. The best way to tell if your sound card is suitable is to make a test recording and listen to it on headphones, especially the quiet passages. If there is significant background noise (compared to the original), consider buying an external audio device. Also, some modern Macs have no line input socket, in which case you have no choice.
Alternatively, you can buy yourself a USB turntable or cassette deck as described below. If you have no audio equipment of your own, this might be a good option, but the turntables, in particular, are rather cheaply made.
Speakers: You will need speakers (or better still, headphones) attached to your computer so that you can hear what you are doing. A pair of headphones is really helpful in assessing the quality of the recordings you make.
CD Burner: You will, of course, need a computer equipped with a CD or DVD burner if you want to burn CDs. Newer Macs don't have one of these so you will need an external unit.
Can I use a laptop? Yes, but there are a couple of potential pitfalls with these. Firstly, many only have a mono input jack and secondly older models have much less disk space available than a comparably priced desktop machine.
To check whether your laptop has a stereo input jack, use VinylStudio to make a test recording and listen to it on headphones. This should reveal whether the recording is stereo, especially if you compare it with the original. You can also, of course, use a USB turntable or other USB device with a laptop, and for many, this is the only option.
5. What Audio Equipment Do I Need and How Do I Hook it Up?
VinylStudio can work with conventional turntables or tape decks connected to your sound card, and also with USB devices. Instructions on hooking up USB devices are available here. This guide concentrates on connecting a conventional turntable or tape deck to the sound card built into your computer.
5.1. I Already Have a Turntable and it is Connected to my Amplifier
If you already have a record deck connected to your amplifier (which must therefore have a phono input), you may need nothing more than a cable to hook it up to your computer. Most older amplifiers (especially those consisting of separate units, rather than the integrated mini/midi units more common today) have a pair of female RCA connectors (also known as phono sockets) on the back labelled Rec Out, Tape Rec or similar. These connectors will look something like this (we're talking about the ones on the far left):
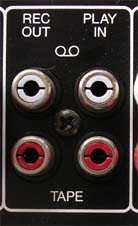 |
 |
| Output from Hi-Fi | Cable |
 |
 |
| Input to PC | Input to Mac |
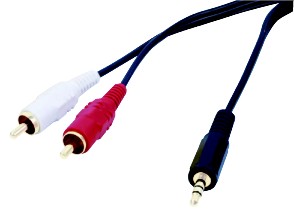
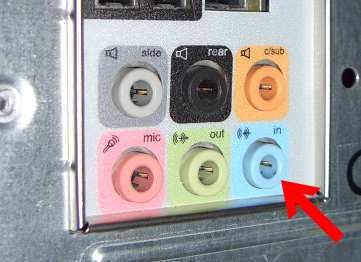
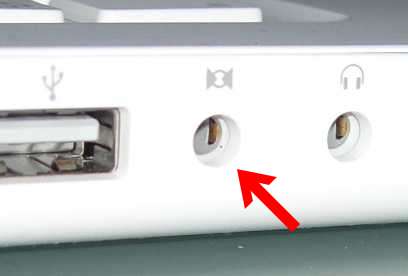
If you are lucky enough to have such an amplifier, you can run a cable like the one pictured above directly to the Line In connector on your computer (arrowed, PC on the left and Mac on the right). On a PC, this connector is normally on the backand is colour coded blue. ON a Mac, it is labeled as shown in the photo.
The cable you need goes under a variety of vaguely similar names, such as 3.5mm Jack to 2 x Male RCA Phono Audio Cable (it's sometimes called a 1/8" jack in the US). These cables are not hard to come by and cost only a few dollars. In the UK, you can get one from Maplin Electronics. You can also get one from Amazon by mail order - search Amazon's website for Jack to RCA cable) to track one down. Make sure you get a cable with male RCA connectors (i.e. plugs) and make sure it is long enough.There may be a link connector on the back of your amplifier between Play In and Rec Out. If so, you can safely remove it. Ensure then that the Tape button on your amplifer is not pressed, otherwise you won't hear anything.
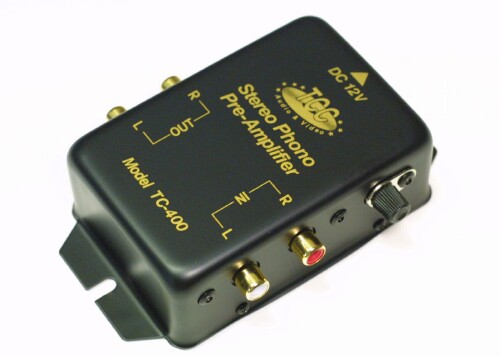
5.2. I Already Have a Turntable but no Amplifier (or my Amplifier is not Suitable)
If you have no amplifier, or if your hi-fi has no suitable output socket or cannot be located near your computer, you will need a phono preamp. This boosts the signal from the pick-up cartridge (which is very weak) to a level sufficient to drive the sound card in your computer. It also equalises the signal, which would otherwise lack bass. In short, you can't do without it. Here's a picture of one:
 |
|
| Phono Preamp | Cable |
| |
|
| Input to PC | Input to Mac |
A basic phono preamp is not expensive, although higher-end equipment can be. The one pictured comes from phonopreamps.com and costs around US$30. In the UK, Maplin Electronics can supply one. To connect the preamp to your sound card, you need the same cable as described in the previous section. The signal leads from the turntable plug directly into the input of the preamp and you should connect the turntable's ground wire to the ground terminal on the preamp, if it has one, to minimise mains hum pickup.
5.3. I Do Not Have a Turntable (or my Turntable is built-in to an integrated system)
If you have no turntable, or if yours is built into an integrated system with no external cabling, you will need to get hold of one. The solution that offers the most choice, and probably the most bang for the buck, is to buy a conventional turntable (perhaps secondhand) and follow the steps above. Make sure you get one which stops at the end of the record so that you can leave your recordings unattended.
Turntables with a built-in phono preamp are also beginning to appear, such as the Denon DP-300F and the Audio Technica AT-PL50. These can be connected directly to your computer's sound card with the cable pictured above.
And, of course, you can use a USB turntable.
5.4. I Want to Record 78's
If you want to record 78's, you must use a suitable stylus. The grooves on a 78 are wider than those on modern albums and a standard stylus will bump along the bottom of the groove and sound horrible. You do not, however, need a 78 speed setting on your turntable as VinylStudio can do the speed conversion from 33 or 45 rpm for you. It will take longer to record each side, of course, and the results won't be quite as good.
VinylStudio's audio cleanup tools, especially the hiss filter, are very useful with the sort of background noise you get on most 78 recordings.
5.5. I Want to Digitize Tapes
If you have an old-fashioned separate cassette deck, it probably has phono output connectors on the back and hence can be connected directly to your sound card as described above. Almost all reel-to-reel machines also have such connectors.
Another very simple solution for cassettes, which works surprisingly well, is to record from a personal cassette player (Walkman) using a cable with a 3.5mm (1/8") Jack plug on each end. Dolby tapes might sound a little sibilant doing things this way but you can use VinylStudio's graphic equaliser to correct this if necessary.
; void (0);)
6. What Software do I Need?
If you go for an all-in-one solution like VinylStudio, it should give you everything you need in a single package, and because it is designed to do precisely what you are trying to do, it is much easier to use than a collection of separate programs of a more general nature. In addition to performing all the tasks described in this guide, VinylStudio helps you organise your collection as it grows, keeps your hard disk tidy and can save disk space. It can also import any recordings you might have made previously.
The remainder of this guide gives you a brief walkthrough of the major steps involved in digitising an album using VinylStudio. There is also more information about VinylStudio elsewhere on this website, including the help file supplied with the software.
7. Recording
The first thing to check is that your signals are getting through. VinylStudio has some tools for this [screenshot] and the help file covers this in detail. VinylStudio can also play back whatever is being recorded through your computer's speakers as it is being recorded so that you can hear what you are doing.
![[screenshot]](javascript: window.open('show_graphic.aspx?image=images/check_level.png&caption=Level Check Window', 'popup', 'menubar=no,toolbar=no,status=no,width=750,height=550,left=75,top=75');void (0);)
The next thing is to make a couple of test recordings and listen to them on headphones, especially the quiet passages, before you spend a lot of time recording albums for real. You don't want to have to do it twice!
It is important to get the recording level right - too low and you will increase the level of background noise on your recordings and lose 'dynamic range', too high and you will get 'clipping' (which can sound very unpleasant). If in doubt, err on the low side.
VinylStudio has recording level indicators (which flash red on overload) and, with most recording devices, a slider to set the level. The recording level will vary somewhat from album to album and there is no reliable way to set it automatically unfortunately, but you can simplify matters by recording similar albums (rock, classical, jazz etc.) in batches. One setting for the recording level slider usually then suffices for several albums, provided that you don't set the level too high.
VinylStudio stops recording automatically at the end of the album. This feature does not always work so well for tapes but a maximum recording time can be set instead, after which time VinylStudio terminates the recording. Yuo can also truncate overly-long recordings in most formats to recover some hard disk space.
8. Splitting Tracks
You don't actually split tracks in VinylStudio as such - you place trackbreaks between each track and VinylStudio then uses this information when burning CDs or saving your tracks as individual files. It is worth taking the trouble to do this as your CDs are then made up of separate tracks, rather than entire LP sides, and you can play the tracks individually.
The process of defining trackbreaks is straightforward - you place markers in the gaps between tracks and then zoom in and adjust them with the mouse to position them precisely [screenshot]. With a little practise, this takes no more than a minute or two per album, except perhaps for live albums which need a bit more care and attention. You can also fade tracks in and out.
![[screenshot]](javascript: window.open('show_graphic.aspx?image=helpfile/images/track_waveform_display.png&caption=Defining Track Breaks', 'popup', 'menubar=no,toolbar=no,status=no,width=720,height=350,left=100,top=200');void (0);)
For many albums, VinylStudio can look up track listings over the Internet; if not, you can type in the track names manually. Having track names available is useful (a) to help you navigate round the recording when using the audio cleanup tools and (b) when you save your tracks as individual files, VinylStudio can name and tag them properly. Entering track names is not essential, however, and if you only want to burn audio CDs you can skip this step. VinylStudio can often also find track durations on line, which puts the trackbreak markers in roughly the right place and makes track splitting much easier.
Like other vinyl-to-CD programs, VinylStudio can scan for trackbreaks automatically. This sounds good on paper but it can be a bit of a hit-and-miss affair, depending on the nature of the music. Entering track times manually (if you have them to hand), or (with luck) finding them online is a much better alternative. VinylStudio will then place trackbreaks in more or less the right place for you and you can then adjust them yourself to get them exactly right.
9. Audio Cleanup Tools
VinylStudio offers a powerful set of audio cleanup tools, which are effective on vinyl albums, tapes and 78s. We do not offer any special effects (such as reverb) but have focussed on what we think is most useful and making it work well.
An important potential issue is disk space usage. VinylStudio tackles this problem in an unusual way. Audio files are large and it is therefore desirable to avoid making unecessary copies of them. On the other hand, you do not want to overwrite your original recordings with a cleaned up version in case you want to change your mind about something later. VinylStudio offers you the best of both worlds by keeping a record of your changes and applying them when necessary. This keeps hard disk space usage down whilst keeping your original recordings intact in case you need them again for any reason.
9.1. Click and Scratch Removal
This is worth doing for 78s and many vinyl recordings, especially classical music, as even records in good condition generate some surface noise. It's no substitute for cleaning records properly before you record them though, and it's worth taking a bit of extra care in doing so as you will have to live with the results for a long time hence (Google "cleaning vinyl" and you will get lots of useful hits).
The mechanics of declicking a recording are simple - you tell VinylStudio what settings you want to use [screenshot], initiate a scan (which takes under a minute for a typical LP side on a modern computer) and then listen to the results. You can scan (or rescan) selected portions of the recording, perhaps with different settings, and there is a multi-level undo/redo facility which lets you revert to the results of a previous scan if you need to.
![[screenshot]](javascript: window.open('show_graphic.aspx?image=helpfile/images/scan_for_clicks.png&caption=Scan for Clicks - Settings', 'popup', 'menubar=no,toolbar=no,status=no,width=700,height=600,left=200,top=200');void (0);)
Automatic scanning is good enough for most recordings, but VinylStudio also lets you insert or adjust click repairs yourself if you need to. Damaged sections of a longer duration can be 'patched' [screenshot]. These are both semi-manual procedures in that you have to identify the damaged section but VinylStudio then generates a repair automatically, and they can work wonders for a badly damaged recording that you are keen to resurrect.
![[screenshot]](javascript: window.open('show_graphic.aspx?image=images/patch.gif&caption=A Patched, Damaged Section of Music', 'popup', 'menubar=no,toolbar=no,status=no,width=650,height=400,left=150,top=150');void (0);)
If you are interested in learning more about VinylStudio's declicker, see
9.2. Hiss Reduction
For vinyl recordings in good condition, hiss reduction is not usually necessary and is not recommended. It works by subtracting a 'noise fingerprint' (taken from a section of the recording where there is no music) from the music itself and therefore, by its very nature, takes something away from the original.
For tapes (particularly cassette tapes) and elderly vinyl, shellac or even cardboard recordings though, it's a different story. Hiss reduction [screenshot] can make a recording much more enjoyable to listen to provided that you don't overdo it; there are some samples on our sound samples page. We have done our best to minimise the distortion (such as warbling or adding a metallic timbre to the sound) that hiss reduction can introduce and unless you try to get rid of every last trace of hiss (which is not recommended either) you should get good results.
![[screenshot]](javascript: window.open('show_graphic.aspx?image=helpfile/images/hiss_filter_dialog.png&caption=Hiss Filter Settings', 'popup', 'menubar=no,toolbar=no,status=no,width=760,height=400,left=100,top=200');void (0);)
VinylStudio's hiss filter works in 'real time', so you can listen to a quiet passage of music and tweak the settings until you get the sound you want. VinylStudio keeps track of your filter settings for each recording so you are free to experiment or change your mind later on.
9.3. Hum Filter
If you need it, turn it on [screenshot]. The impact on sound quality is negligible. To figure out if you need it, listen to a quiet passage of music (e.g. between tracks) and if you can hear a low pitched humming or buzzing sound, try turning the hum filter on. Again filtering is applied in real time so you will hear the effect straightaway.
![[screenshot]](javascript: window.open('show_graphic.aspx?image=helpfile/images/hum_filter_dialog.png&caption=Hum Filter', 'popup', 'menubar=no,toolbar=no,status=no,width=750,height=400,left=100,top=200');void (0);)
If a recording contains both hiss and hum it is important to turn the hum filter on, as otherwise the hiss filter tends to degrade the bass notes.
9.4. Rumble Filter
Rumble is low frequency vibration picked up, principally, from the turntable bearings and it can potentially damage loudspeakers at high volume settings. You generally can't hear it. Again, this filter has negligible effect on sound quality, so you should use it [screenshot] unless you recorded with the rumble filter enabled on your phono preamp.
![[screenshot]](javascript: window.open('show_graphic.aspx?image=helpfile/images/rumble_filter_dialog.png&caption=Rumble Filter', 'popup', 'menubar=no,toolbar=no,status=no,width=750,height=400,left=100,top=200');void (0);)
9.5. Graphic Equaliser
VinylStudio has a 10-band graphic equaliser which you can use to adjust the tonal balance of your recordings [screenshot]. It has enough frequency bands to allow you to, say, liven up an otherwise rather dull-sounding recording made from a cassette tape or to tweak a recording whose sound is not to your taste. Like the filters above, it is applied in real time and, like all filters, can be applied selectively to individual tracks, or to any selected parts of the recording.
![[screenshot]](javascript: window.open('show_graphic.aspx?image=helpfile/images/equaliser.png&caption=Graphic Equaliser', 'popup', 'menubar=no,toolbar=no,status=no,width=750,height=400,left=100,top=200');void (0);)
If you are an advanced user and your equalisation requirements are more complex than the Graphic Equaliser can handle, you can get more flexibility by defining an FFT filter of your own.
9.6. Software Recording Equalisation
As of V8.5, VinylStudio can apply apply RIAA equalisation (and other curves) to your recordings [screenshot]. This is useful you want to use a 'flat' phono preamp, but is also useful when recording 78s and other older material that doesn't use the standard RIAA curve. In such cases, VinylStudio can also remove for the standard RIAA equalisation applied by most phono preamps before applying a different curve, and can compensate for the distortions introduced when recording 78s at 45 rpm.
![[screenshot]](javascript: window.open('show_graphic.aspx?image=helpfile/images/record_eq.png&caption=Recording Equalisation', 'popup', 'menubar=no,toolbar=no,status=no,width=800,height=400,left=100,top=200');void (0);)
VinylStudio can apply recording equalisation either at the time you record (in which case the results are permanently stored in the recorded file), or afterwards, in which case you can experiment until you are happy with how it sounds.
10. Saving Your Tracks
VinylStudio can save the tracks for any or all of your recorded albums in a variety of file formats on demand [screenshot] and makes it easy to copy them across to your MP3 player [screenshot] . These files are tagged with album and track information, and you can play these files on any computer (including Windows Media Player and iTunes) or copy them to a streaming media server.
![[screenshot]](javascript: window.open('show_graphic.aspx?image=images/save_tracks.png&caption=Saving Tracks', 'popup', 'menubar=no,toolbar=no,status=no,width=800,height=650,left=100,top=100');void (0);)
![[screenshot]](javascript: window.open('show_graphic.aspx?image=images/copy_to_player.gif&caption=Copying Tracks to an MP3 Player', 'popup', 'menubar=no,toolbar=no,status=no,width=820,height=650,left=100,top=100');void (0);)
On the Mac, VinylStudio integrates with the iTunes library. Tracks saved in VinylStudio appear automatically, at your option, in iTunes.
11. Burning CDs
Dedicated digitising software makes burning CDs simple, since you don't have to deal with individual files. It is also very easy to burn 'mix and match' CDs containing a selection of tracks from your favourite albums.
VinylStudio can create both audio CDs (which should play in any player) and MP3 CDs (which will only work in CD players specifically designed to play them) [screenshot]. You can fit around 150 3-minute tracks on an MP3 CD (good for long car journeys!) and the files are tagged with album artist, album title and track title which will show up on most players' display panels.
![[screenshot]](javascript: window.open('show_graphic.aspx?image=images/burn_screen.gif&caption=Preparing to Burn a CD', 'popup', 'menubar=no,toolbar=no,status=no,width=800,height=650,left=75,top=75');void (0);)
VinylStudio can also export CD track listings to a file that most CD-cover editors (including Nero Cover Designer) can read. This avoids the need to type the track names in again.
12. Can I do it for free?
Well you can, but it's hard work and you may not get such good results. Many people use Audacity, and while this is a very capable audio editor, it is not particularly well suited to digitising records and tapes. For example, track splitting is much more difficult and time-consuming, CDs have to be burned outside the program and the declicker doesn't work all that well. There is also quite a steeper learning curve. Whether you use our software or somebody elses, a dedicated digitising program is a worthwhile investment if you have a collection of any size to process.
13. Conclusion
We hope that this guide has been of interest. If you have any questions, comments or suggestions please contact us through our website: www.alpinesoft.co.uk/contact_us.aspx. You might also like to take a look at our FAQ.
To download a free trial copy of VinylStudio (record upto 5 albums, no time limit) please go to www.alpinesoft.co.uk/VinylStudio/download.aspx.
Software and website Copyright AlpineSoft, 2025.